Quick Start
This walkthrough sets up your first project with a PM agent. The PM spawns, directs, and monitors Claude sessions on your behalf — all through Slack.
Prerequisites
- summon-claude installed
- Slack app configured and configuration verified (
summon config checkpassing) - A project directory (any git repo works)
Step 1: Register a project
Navigate to your project directory and register it:
summon project add my-api ~/code/my-api
This creates a named project that summon-claude tracks. You can optionally set workflow instructions that guide every session:
summon project workflow set my-api
Step 2: Start your Project Manager agent
summon project up
This starts PM agents for all registered projects. The PM prints an authentication code:
==================================================
  SUMMON CODE: a7f3b219
  Type in Slack: /summon a7f3b219
  Expires in 5 minutes
==================================================
The code is single-use — type it exactly as shown in any Slack channel. Codes expire after 5 minutes; run summon project up again to get a new one.
Background process
The session runs as a background daemon. You can close this terminal window after authenticating — Claude keeps running.
Step 3: Authenticate in Slack
Open Slack, go to any channel where you want the PM to live, and type:
/summon ABC123
Use the exact code from your terminal. The PM agent binds to that channel.

Choose your channel
Each session gets its own dedicated channel. You can use an existing channel or create one specifically for this session. All of Claude's responses will appear there.
Step 4: Give the PM its first task
Once authenticated, summon-claude posts a welcome message in the channel. Send the PM its first task directly in the channel:
Review the README and suggest improvements
Emoji lifecycle
summon-claude uses emoji reactions to show what Claude is doing:
| Emoji | Meaning |
|---|---|
 |
Message received, Claude is thinking |
 |
Claude is actively working (running tools) |
 |
Turn completed successfully |
 |
Turn cancelled by !stop command |
 |
Turn ended with an error |
For full details on emoji reactions and thread organization, see Threading.
Step 5: Review tool permissions
When Claude wants to use a tool (run a command, edit a file, etc.), summon-claude posts an interactive message with Approve, Approve for session, and Deny buttons. The message is deleted after you click, keeping the channel clean.
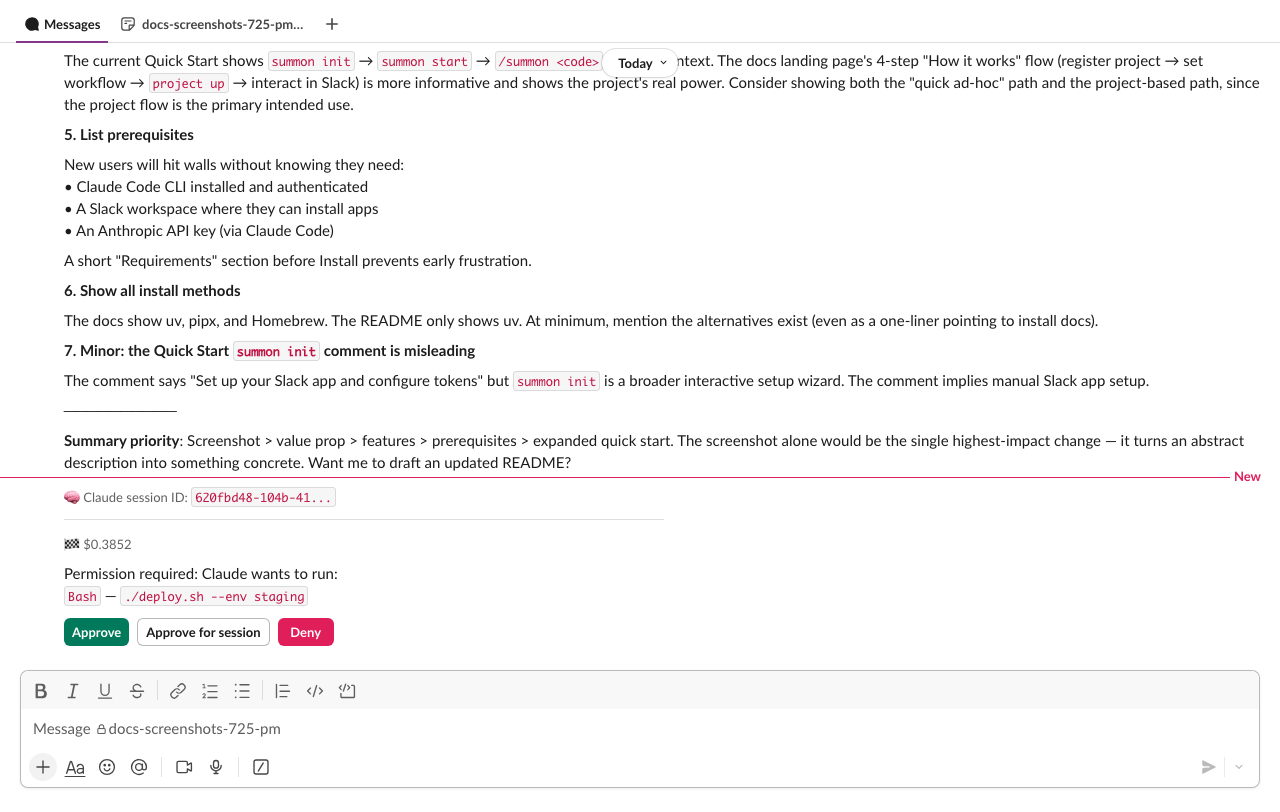
Click Approve for a one-time approval, Approve for session to auto-approve that tool for the rest of the session, or Deny to reject. Claude adapts its approach based on your decision. Read-only tools (file reads, searches, web fetches) are auto-approved without prompting — see Permissions for the full list.
Type !help in the Slack channel to see all available in-channel commands:
!help
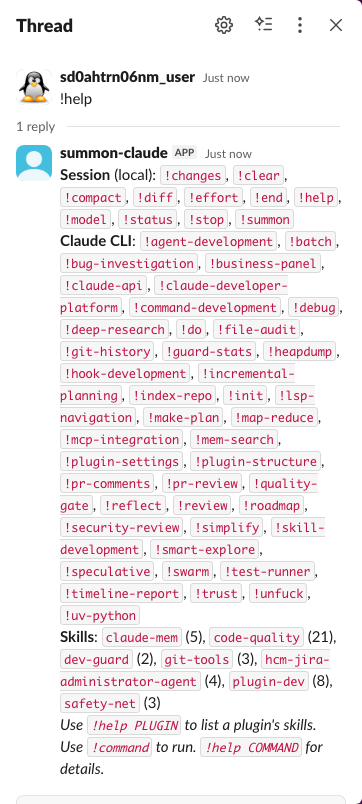
Common commands:
| Command | Description |
|---|---|
!help |
List all available commands |
!status |
Show session status and context usage |
!end |
End the session gracefully |
!stop |
Cancel the current Claude turn (session stays active) |
Step 6: End the session
When you're done, stop all project sessions:
summon project down
Or end just the PM session from Slack:
!end
Either method terminates the Claude session and posts a summary in the channel.
Quick ad-hoc sessions (no project setup)
For one-off tasks that don't need a PM, use summon start directly:
summon start
This creates a single session. Authenticate in Slack with /summon CODE, interact, and end with !end or summon stop.
See Sessions for details.
See also
- Projects — multi-session project management with PM agents
- Sessions — session lifecycle, naming, and management
- Commands — full command reference for in-channel interaction
- Permissions — how tool permission handling works
- Configuration — customize summon-claude behavior